Replacing the Hinge of Titanium PowerBooks. |
Just two notes in the beginning: (1) On this page you will find links to other web pages. clicking these links will take you to another location, which I am not responsible for.
(2) Performing the procedure described below is very risky and it is very likely that you irreversibly damage your notebook. I do not take any responsibility for anything that happens with your computer just because you have done something like described here (what might be wrong). Please understand this as a report about what is possible instead of a guide.
Intro

Just recently the left hinge of my PowerBook broke. This is a very bad experience. It just broke, when I lift the display and the hinge part attached to the body just kept its position. I knew that the warranty has alreeady expired, and I started to search the web for some solutions. In summary what you will find on the web is the following:
-
Quite much PowerBook Titanium owners have reported that one or both hinges were broken. See [1] [2] and [3]. It looks like the design of the machine is not well engineered at this point. But I have also noticed that other types of notebooks have the same kind of problem: the hinges seem to be difficult parts, because they must have this built-in brake ability to keep the display in it's position, and also allow to adjust the angle easily.
-
Repairing the PowerBook would cost about USD 1000 at Apple or any Apple authorized repair service. This is quite expensive. The reason for this is that only the whole display unit (yes, including the panel) will be exchanged. One reason for that might be because the casing is glued together. So, it is quite uncomfortable to open the unit for replacing single parts.
-
Some online stores offer spare parts (and hinges) for various PowerBook models ([5], [6], and [7]). Obviously they buy PowerBooks used or even already defective to disassemble them for selling the parts. I have found a hinge for my PowerBook at one of the stores. for USD 149 - this is still expensive for just a small piece of metal, but far better than buying a whole new display unit. I have also found that MacResQ offers a service where you send-in your PowerBook and get the hinges replaced for USD 499 [4].
-
If you do not mind about the way your PowerBooks looks, a solution from Kjartan P. Sigurdsson might be interesting. He describes how to fix it without spare parts [8].
Replacement Main Issues
I did not find the USD 1000 solution feasible for my problem. 1000 dollars is just too close to an iBook G4. I decided to order a hinge at pbmedic.com. To Germany the shipping was pretty ok and very quick (USD 29 in about one week). But the procedure was much more difficult than I have expected, just quickly the main issues:
-
You can replace the hinge without detaching the cables of the display unit from the logic board. I found this risky, because if the cables will be damaged another spare will be needed ... I have decided to detach the cables of the display unit from the logic board. This has one main disadvantage: you have to take apart everything before the cables of the display can be removed. In fact, the difficult thing is not about unplugging the cable form the logic borad, but pulling the cable with the connector through the tiny hole at the back of the case.
-
If you separate the heat-exchanger from the logic board you need to scratch the old "thermal transfer material" away from the CPU and the cooling unit and apply some new. You really need to do that because otherwise the processor won't be cooled properly. Then, it is really likely that your processor will be over-heated and damaged.
-
As said, the display housing is glued together. I have read something that putting the unit into the freezer could help: at low temperature (minus 15 degrees celsius) the metal will contract in a way that the glue cannot keep it. Actually the display won't be damaged in the freezer. But it did not help me neither. Maybe this kind of cold-temperature-glue was used for earlier versions than mine of the Titaniums.
-
Opening the display housing means damaging the housing. I do not see how to perform this in a way not to damage the finish and the case.
Replacement Procedure
My PowerNook is a DVI-867Mhz version, which was the last one released before the aluminium machines were released. Therefore the description and the pictures might be different for previous revisions of the PowerBook G4.:
-
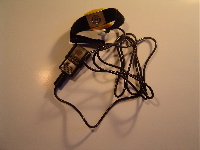
I have used a wrist strap for electrostatic discharge. I would recommend anyone to use a kind of arrangement to make sure that no electrostatic discharge might happen and damage the computer.
-
Get something to organise your crews, you get a plenty of them. write down, where you have removed them.
-
You will need a Torx T6 and a Torx T8 tool, some thermal transfer material (if you decide to separate the display unit from the body), some flat screwdriver, and some glue for the titanium housing of the display. The glue I have used was 20ml "sekundenkleber dickflüssig" (far more than enough), which would mean in English "superglue" I suppose. I think many glues would work, but I would recommend one that hardens very quickly.
Part one, which is separating the display unit form the body:
-
Remove the battery, remove the keyboard. for the keyboard you must unplug the (black) connector. try to use a philips-head screwdriver to lift the endings of the connector.
-
With the display closed, remove the bottom case. There are seven screws and this procedure should be described in your user manual (to install the AirPort Card).
-
Remove the drives. The drives must be removed, because you need to remove the frame in order to remove the heat exchanger. You might want to remove the black plastic bridge between the drives first. The hard drive has got just on connector and is fairly easy to remove. The CD/DVD unit has three flat brown connectors and two wired ones. It is very important to remove a so-called EMI-clip first, which presses the flat brown connector to the frame.
The first wire-connector one is pretty easy to see (white and rose clables) the second one is a bit hidden under the black shielding at the lower right corner seen from the ports. Lift the shilding a bit to unplug the connector (it has grey- and black wires) -
Remove the DC-adapter. you will need to remove two screws and unplug one connector. move the connector a bit outside the casing through the hole to get it completely out:

-
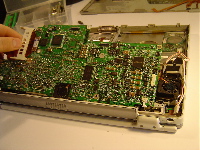
Remove the logic board. To do so remove the five main screws (they look bronze colored) and two near the PC Card port - one at the right top corner and the one shown in the picture.

All cables must be unplugged. The first two pictures show the three connectors on the keyboard side to unplug. The cables are battery, baackup battery and PC card connector.


On the bottom side, unplug all remaining connectors you can see.

To get the board, it can be lifted on the drive-bay side and gently pulled out away from the ports. Do not go too quick with this, because on the other side of the board two cables are still connected: the modem-port and the plug for the secondary fan. The plug from the secondary fan can be easily removed. I do not know how to deal with the modem port. In my PowerBook the cable was long enough just to keep it attached (remember, the goal is the dispaly connector) but for my convenience I removed the connector from the logic board by pressing the latches out.

-
Separate the heat-exchanger from the frame. Remove the five screws on the keyboard side and the four screws on the port panel. You will loosen two metal couterparts showed in the second picture.

-
Remove the four screws that hold the frame. Three of them are black and located, where the frame meets the body (at the corners of the battery bay and netween hard drive and optical drive). One of them is metallic and holds a metal clip just right from the secondary fan.
-
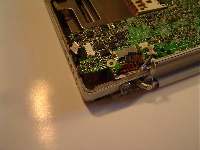
Then you can remove the hinge caps and then loosen the hinges from the body. This will loosen the heat exchanger module. One of the four screew is a bit shorter than the other ones. Remember it's position! It is the right one seen on the second picture.

-
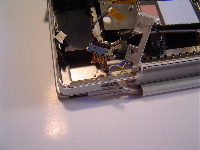
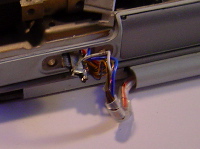
Seen from the ports the right sided cable of the display unit can be pulled out easily through the hole. But for the left side you must turn the piece between case and rib frame.
-
Then you can pull with the connector at the end through that hole. Geschafft!

Part two, which is opening the dispaly unit for removing the hinge:
-
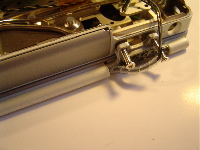
Remove the four screws on the display unit. I am not sure if only removing the lower two is sufficient.
-
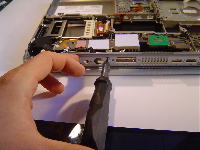
In fact you must move a flat headed screwdriver to bend the display case at the hinge area. This is mentally the most difficult part, because at this point you irreversibly damage your PowerBook.

-
With the screwdriver open successively the joint/groove. Then the broken hinge can be drawed out. Use a clamp tool for this.
-
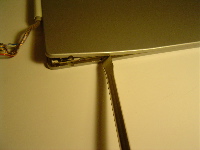
In fact, that's it. Now, proceed in the reverse order to re-assemble the PowerBook. To close the display housing I haved use some glue used for metal surfaces.
The result is ok for me, but not very well done by myself. As you can see on the picture the joint/groove of the display housing is by not as sleek as before. Also I was not very much skilled with applying the glue - but with most light conditions you wouldn't realise it. (image is actually larger, to see it open image in a new window.)

Links
|
[1] |
Discussion on O'Grady's Powerpage |
|
[2] |
|
|
[3] |
Discussion on MacOpinion |
|
[4] |
|
|
[5] |
|
|
[6] |
|
|
[7] |
|
|
[8] |
Misc
Since the PowerBook was open anyway I have made some pictures. First one showing the XC7455 in a 867 Mhz version.

Here we have the Radeon 9000 graphics chip. It looks like the memory is mounted with the chip on one module.

The AirPort antenna along with the backup battery.

Copyright (C) 2004 [MICHAEL C JAEGER].
The contents of this file are subject to the Free Content License. You may not use or exploit this work, except in compliance with the License. License conditions are available at http://www.uvm.nrw.de/opencontent or as written version at Geschäftsstelle des Kompetenznetzwerkes Universitätsverbund MultiMedia NRW, Universitätsstraße 11, D-58097 Hagen.
|
|
(20040103, webmaster[at]mcj.de) |